![]() I have to admit, it wasn't love at first sight (I mean, just look at those tusks), but I'm now head over heels for Grunt. Grunt is a task runner that chugs along in the background and, with the right set of plugins, can be set to automatically combine and minify CSS and JavaScript files; check HTML, Javascript, and JQuery for errors; compile Sass to CSS; write browser-compatible code; and more. Did I mention that it does all of this automatically?
I have to admit, it wasn't love at first sight (I mean, just look at those tusks), but I'm now head over heels for Grunt. Grunt is a task runner that chugs along in the background and, with the right set of plugins, can be set to automatically combine and minify CSS and JavaScript files; check HTML, Javascript, and JQuery for errors; compile Sass to CSS; write browser-compatible code; and more. Did I mention that it does all of this automatically?
In this article, I'm going to share the Grunt workflow I use to speed up my development and end up with a set of super-fast-loading files to post to my live server when I'm done. My setup borrows liberally from one demonstrated by Ray Villalobos (@planetoftheweb) in his course for Lynda.com, "Responsive CSS with Sass and Compass." I also picked up some tricks from a case study by Vitaly Friedman (@smashingmag), editor of Smashing Magazine, about a re-design of their site focused on enhancing performance. Finally, if you're a "just show me the code" kind of person, or you want to follow along with the article, you can find (and download) my default web workflow configuration from Github.
Fair warning: my goal here is to get you up and running with a set of automated tasks that will make your work easier and not necessarily to explain the inner workings of Grunt and its dependencies; thus, I'll be focusing on the "how" rather than the "why," and won't be saying much about, for example, the syntax of JSON or why the "grunt.js" file is written the way that it is. Note also that although I use git for version control on nearly every web project I develop, I won't be discussing that either, as it could easily take up its own article.
So, if you're ready to speed up your web development (and the performance of your site), let's get started with setting up an automated workflow with Grunt.
Folder Structure
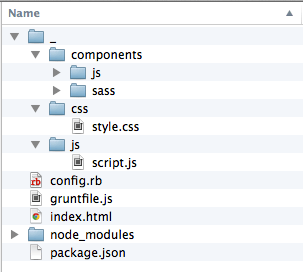 My usual approach to a new web project these days is to start with a more-or-less standard folder structure like the one pictured here. My project is grouped under a main folder (named "_" in this example). Within that I have a folder titled "components." The "components" folder contains the Sass and JavaScript files that I will actually be working in and editing, and that Grunt will be watching for changes.
The "css" and "js" folders (directly under "_", not in "components") are where, after working its automated magic on the files in the "components" folder, Grunt will place the files it creates for me.
I also keep, in my main project directory, any HTML files that I'm working with (in this case, I'm starting with only one, "index.html"). The remaining files have to do with how I have configured Grunt in my workflow. More on that in a moment. If you're following along, you can just create the following structure and wait on the rest:
MAIN PROJECT FOLDER ("e.g., '-")
-components
--js
--sass
-css
---style.css (can be empty)
-js
---script.js (can be empty)
-index.hml
Install Node.js
In order to use Grunt, you will need to have installed Node.js. Node.js comes with something called "NPM," or "Node Package Manager." NPM is the tool you will use to install Grunt, and also provides a way for you to indicate (in a JSON file), what plugins are necessary to run your project. On a Mac, you can check to see if you already have Node.js installed by opening the Terminal application and typing:
node -v
If you need to install Node.js, you can download it from the node.js site.
Create Your Package File
NPM can download and install all the plugins you'll need for your project, but first it will need to be provided with a list of what plugins you need. That list takes the form of a JSON file called "package.js." I created "package.js" in my main project folder and included the following code:
{
  "name": "webworkflow",
  "version": "0.0.1",
  "dependencies": {
    "grunt": "~0.4.1",
    "grunt-contrib-watch": "~0.5.3",
    "grunt-contrib-compass": "~0.5.0",
    "grunt-contrib-uglify": "~0.2.2",
    "matchdep": "~0.1.2"
  },
  "devDependencies": {
    "css-condense": "0.0.6",
    "grunt-autoprefixer": "^1.0.1",
    "grunt-contrib-cssmin": "^0.10.0",
    "grunt-contrib-jshint": "^0.10.0",
    "grunt-cssc": "^0.2.6",
    "grunt-htmlhint": "^0.4.1"
  }
}
What Are All These Plugins?
In addition to Grunt itself, this package file also lists a number of related plugins. Each of the plugins itemized in our package file will make one or more tasks available for Grunt to run. For example, "grunt-contrib-uglify" refers to a plugin that combines all of our Javascript into a single, minified (and thus fast-loading) file. Another plugin, "grunt-contrib-cssc," checks our CSS code for redundant code before handing it off to another extension, "grunt-contrib-ccssmin," which combines and minifies our CSS files. Here is a list of the plugins I use in my Grunt workflow, what they do, and links to their documentation and download pages.
- grunt-contrib-watch. Possibly the most important plugin, "watch" allows Grunt to run predefined tasks whenever watched file patterns are added, changed, or deleted.
- grunt-cotrib-compass. Uses the Compass compiler to translate Sass (SCSS) into CSS.
- grunt-contrib-uglify. Minifies JavaScript files.
- grunt-contrib-jshint. Validates JavaScript (and JQuery) using JSHint, notifying you of the type and location of any errors by displaying in the terminal.
- css-condense. Minifies CSS files.
- grunt-autoprefixer. Autoprefixer uses data based on current browser popularity and property support to apply appropriate vendor prefixes to your plain CSS code.
- grunt-contrib-cssmin. Combines and compresses CSS files.
- grunt-cssc. Looks for duplicate/overlapping CSS rules (e.g., declaring the same font-color for "p" and "p.someclass") and consolidates them whenever possible to save space.
- grunt-htmlhint. Validates HTML code according to configurable rules (e.g., can look for closing tags to match any open ones, checks to see if there is more than one "id" attribute per document, etc.). Notifies you of the type and location of any errors by displaying in the terminal.
Install Grunt and Plugins
With your package.json file in place, go back to the terminal and from your main project directory ("_" if you used the same file structure and naming conventions that I do), run the following command:
npm install
This will cause Node.js's package manager to look at your "package.json" file and install all the extansions listed there into your project folder in a folder named "node_modules." If you expand or open this folder, you'll find that this is where all the grunt plugins are located.
To install Grunt itself, run the following command (you may need to prefix this command with "sudo" if your user account doesn't have adequate permissions; you may then be prompted to enter the password for the machine you're on).
npm install -g grunt-cli
So far, so good. Now it's time to provide instructions to Grunt about the tasks you want it to perform, when, and on what files. We do that with a file called "grunt.js."
The Grunt.js File
Once grunt and its plugins have been installed, you can create a new file in your main project directory called "grunt.js." Here is what my grunt file looks like:
module.exports = function(grunt) {
	grunt.loadNpmTasks('grunt-contrib-uglify');
	grunt.loadNpmTasks('grunt-contrib-watch');
	grunt.loadNpmTasks('grunt-contrib-compass');
	grunt.loadNpmTasks('grunt-contrib-jshint');
	grunt.loadNpmTasks('grunt-htmlhint');
	grunt.loadNpmTasks('grunt-autoprefixer');
	grunt.loadNpmTasks('grunt-cssc');
	grunt.loadNpmTasks('grunt-contrib-cssmin');

	grunt.initConfig ({
		uglify: {
			my_target: {
				files: {
					'_/js/script.js' : ['_/components/js/*.js'] //compresses and combine multiple js files
				} //files
			} //my_target
		}, //uglify

		jshint: {
			js_target: {
				src: ['_/components/js/*.js']
			}, //js_target
			options: { force: true }, //report JSHint errors but not fail the task
		}, //jshint

		compass: {
			dev: {
				options: {
					config: 'config.rb'
				} //options
			} //dev
		}, //compass

		cssc: {
	    build: {
	       options: {
	        consolidateViaDeclarations: true,
	        consolidateViaSelectors:    true,
	        consolidateMediaQueries:    true
	      }
	    } //build
  	is}, //cssc

  	autoprefixer: {
  		build: {
  			expand: true,
	      flatten: true,
	      src: '_/css/style.css',
	      dest: '_/css'
  		} //build
  	}, //autoprefixer

  	cssmin: {
	    build: {
	        src: '_/css/style.css',
	        dest: '_/css/style.css'
	    } //build
		}, //cssmin

		htmlhint: {
            build: {
                options: {
                  'tag-pair': true,
                  'tagname-lowercase': true,
                  'attr-lowercase': true,
                  'attr-value-double-quotes': true,
                  'spec-char-escape': true,
                  'id-unique': true
                }, //options
                src: ['*.html']
            } //build
		}, //htmlhint

		watch: {
			options: { livereload: true }, // reloads browser on save
			scripts: {
				files: ['_/components/js/*.js'],
				tasks: ['jshint', 'uglify']
			}, //scripts
			html: {
				files: ['*.html'],
				tasks: ['htmlhint:build']
			}, //html
			sass: {
				files: ['_/components/sass/*.scss'],
				tasks: ['compass:dev', 'autoprefixer:build', 'cssc:build', 'cssmin:build']
			} //sass
		} //watch
	}) //initConfig
	grunt.registerTask('default', 'watch');
} //exports
What Is Going on in this Grunt File?
So, at least the way I've formatted it, my grunt file is close to 100 lines of code. What is all this? Well, let's break it down. Everything in our grunt file is wrapped in a single function — module.exports = functions(grunt) {. . .}.
The first chunk of that function (lines 2–9) loads all of the plugins that we installed using NPM. Each of these plugins will be executing some automated task that will help us to write our code.
The next major chunk of code is wrapped in the grunt.initConfig function (inside module.exports). Within that, each task is an object, identified by name ("uglify," "jshint," "compass," and so on) and with parameters set within curly braces. Grunt's documentation provides an in-depth explanation of how to configure tasks and the documentation pages of individual plugins provide still more. Configuring tasks may involve specifying how the task should behave (for example, setting "tag-pair" to "true" in the "htmlhint" object instructs that plugin to look for a closing tag to match each opening tag).
Just as important, tasks specify the source and destination files for the task. So, for example, the source files for the uglify task are defined as "_/components/js/*.js", that is any file with a ".js" extension in the "_/components/js" folder. Uglify will take any scripts found in those source files, minify the code, and create a single, new file out of it. The destination has been defined as "_/js/script.js", so the new file will be saved in that location with that name. When the task is run, the existing "script.js" file in the destination directory will be overwritten, but the individual files in "_/components/js/" will remain untouched. Configured in this way, Grunt offers the best of both worlds: discrete script files with human-readable code and comments in the "components" directory for you, and a single fast-loading "script.js" file for your web server.
Setting up each of these tasks will allow us to run them by typing "grunt 'task_name'" into the terminal (while in our main project directory). So, for example, with my grunt task configured in "grunt.js" I can type "grunt uglify" and the uglify task will do its work on the files in "_/components/js" run and overwrite "_/js/script.js." This is useful, but we don't want to have to manually run every task, every time. Ideally, we'd like all of these tasks to happen automatically and at the appropriate times (for example, we probably want uglify to run whenever we save a change to a javascript file in the "_/components/js" directory). That's where the "watch" task comes in.
Grunt Watch: Where the Automation Magic Happens
The watch plugin ("grunt-contrib-watch") monitors specified files and folders and can then launch a task in response to changes. Let's take a closer look at this part of our grunt.js file (lines 75-89):
watch: {
			options: { livereload: true }, // reloads browser on save
			scripts: {
				files: ['_/components/js/*.js'],
				tasks: ['jshint', 'uglify']
			}, //scripts
			html: {
				files: ['*.html'],
				tasks: ['htmlhint:build']
			}, //html
			sass: {
				files: ['_/components/sass/*.scss'],
				tasks: ['compass:dev', 'autoprefixer:build', 'cssc:build', 'cssmin:build']
			} //sass
		} //watch
The watch object defined in these lines tells Grunt what tasks to run automatically and in response to changes in which files. The "livereload" setting here is one of my favorites. Grunt watches any HTML files in the project that are currently open in a browser. When you make and save a change to that HTML file or to any of the files it's relying on for styling or behavior, Grunt automatically reloads the page in the browser so that you immediately see the changes—a great feature if you're designing in the browser.
The instructions in "scripts" tells Grunt to watch "_/components/js" for changes to JavaScript files. When a .js file is saved and changed it runs the two tasks listed in the "tasks" array. First, it runs "jshint," which checks the JavaScript for errors and outputs these to the terminal (this alone can save you a lot of time you might have spent debugging your scripts). Once "jshint" has completed its check, it hands off the files to "uglify" to combine and minify them into "_/js/script.js" (the destination defined in the configuration of the "uglify" task).
The "html" part of the watch task keeps on the lookout for changes to any of our .html files. When a change is saved it checks our HTML according to the settings we configured for "htmlhint," letting us know in the terminal if there are any issues.
Sass & Partials
Since we're using Sass, the handling of CSS is a little more complicated. The "sass" watch task looks for any changes to our Sass files (".scss") in "_/compontents/sass." When it finds a saved change, the first thing it does is convert the Sass into CSS using the "compass:dev" task.
A short, but important digression regarding how I'm using Sass in this workflow: the way I work, I may have several files that are, in Sassy-talk, referred to as "partials." A partial is a modular snippet of (S)CSS that is named with a leading underscore (e.g., "_layout.scss"). The leading underscore lets Sass know that this file should not, on its own, be converted into CSS. Instead, these modular snippets of code are brought into other, non-partial (i.e., full) Sass files by means of the @import command (e.g. @import "variables"). In my "_components/sass" directory, I have a number of partials, but only one actual Sass file that is converted to CSS: "style.scss." All of the partials are imported into this file and it is the only file for which an equivalent CSS file will be created.
Compass
It's the "compass:dev" task (lines 27-33 in "grunt.js") in our Grunt workflow that actually generates CSS from our "style.scss" file.
The configuration settings for compass are located in a file called "config.rb," located in the main project directory ("_"). This is what my config.rb file contains.
css_dir = '_/css'
sass_dir = '_/components/sass'
javascripts_dir = '_/js'
output_style = :nested
So, according to the directions provided in "config.rb," the "compass-dev" task will create equivalent CSS files to the Sass files it finds in "_/components/sass" and place these new files in "_/css." The way I've structured things, it will find only one SCSS file ("style.scss") and so produce only one CSS file ("style.css"). That CSS file, though, is going to get a major make-over before it's final.
Immediately after "style.css" is created, Grunt runs the "autoprefixer:build" task, which operates on this newly-minted CSS file and adds any additional code that may be necessary for browser compatibility. The next task in the sequence is "cssc:build," which checks this same CSS file for duplicate or overlapping rules and makes corrections where appropriate. Finally, Grunt runs the "cssmin:build" task which minifies "style.css" (removing comments, unnecessary spacing, etc.). The result is a single, super-fast-loading style file for your project.
Finishing Up with Grunt.js
Well, the hard part is over. We've defined all of our tasks, including a meta-task ("watch") to keep an eye on files and execute other tasks when they change. The second to last line of our file (just before the final curly brace that closes out the module.exports function in which everything else is wrapped) is:
grunt.registerTask('default', 'watch');This tells grunt that the "watch" task is its default task. That means that simply typing "grunt" in Terminal, with no specific task name after it, will run the "watch" task.
Grunt in Action
That's it; with all this in place Grunt is ready to roll. In Terminal, make sure you're in your main project directory and type "grunt." You'll see a message like the following.
![]()
Grunt is watching for any changes in the files for which it has tasks. Let's make a change to one of those files and see how Grunt responds. I have a JavaScript file in "_/components/js" called "script.js." It started out empty, but I just added the following function and saved the file.
function test() {
	return "hi there worlds"
}
Notice anything funny about that function? I forgot to add a semicolon to the end of line 2. Let's see what Grunt does with this when I save the file.
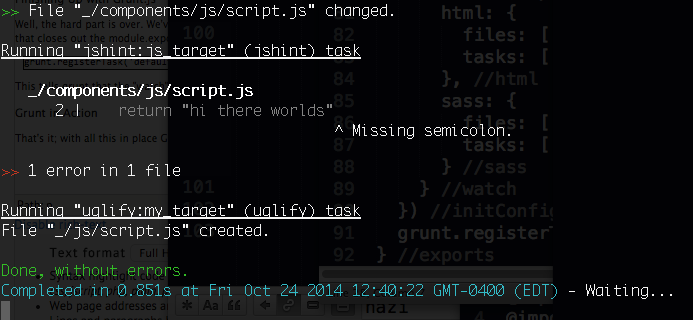
As expected, Grunt ran the two tasks it was supposed to when a JavaScript file in "_/components/js" was changed. First it ran "jshint", which caught my error—even showing me exactly where the problem was. Next, "uglify" went ahead and created the minified version of the file in the "_/js" directory.
Let's try this again. If I go back into the original file in "_/components/js" and add the semicolon, I have this:
function test() {
	return "hi there worlds";
}
I save the change and Grunt jumps back into action:
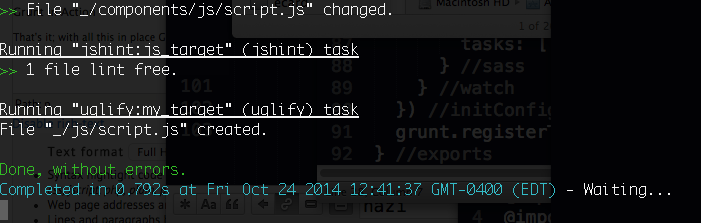
The "jshint" task runs again and states that the file is "lint free," meaning it no longer has any errors. "Uglify" then minimizes the file. The whole process took less than a second. Go Grunt!
I hope this article has provided you with a basic understanding of what Grunt can do to automate your web workflow and how to go about configuring it. If you want to use my exact configuration for a workflow (or use it as a basis for one of your own), you can find it on Github. And, of course, we've only just scratched the surface of what you can do with Grunt; there are thousands of plugins on the Grunt site. So go forth and get grunting!